Pages Menu
Categories Menu

Posted by on Mar 7, 2014 in Modern Patio Furniture | 0 comments

Which of these Contemporary Patio Benches is Best for You?

Which of these Contemporary Patio Benches is Best for You?

The type of bench you select for your home or business depends on the setting, your design preferences and your storage needs. You can find contemporary patio benches in a wide variety of styles for indoor or outdoor use, made from resin, wood or stone. Upholstered benches are common in many styles of bedroom décor, as well as in foyers. Check out the most popular styles of benches and choose the best one for your space, needs and budget.

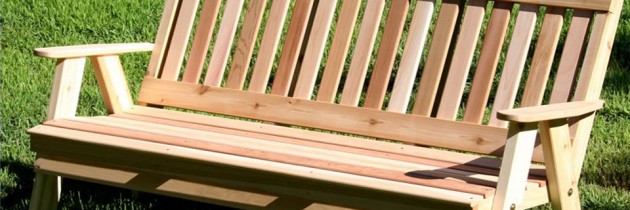
English Garden Bench

A traditional English garden bench like Classic Three-Seater Bench by Royal Teak Collection is made from wood and has a very structured design with tight slats along the seat and open slats along the back. English garden benches also have armrests on either side for added comfort. You can find English garden benches that are painted or stained to coordinate with the décor in your garden or yard.

Backless Outdoor Bench

You can find backless benches in a variety of styles to fit any outdoor space. These benches have neither backs nor armrests and are the easiest kind of bench to make. Otherwise known as deck benches, you will see simple structures around the perimeter of a porch or deck, under a tree or standing alone in a garden. Most have slatted seats like the Mason 3-Seater Backless Bench by Anderson Teak, but you can also find solid wooden or stone seats attached to legs or a frame.

Storage Bench

Storage benches may be backless or, in the style of an English garden bench, have a back and armrests. Most often, the seats are attached to the base of the bench with hinges, but you may also find storage benches with seats, or bench tops that are completely removable. There are even styles that come with shelves underneath like the Sauna Bench by All Things Cedar. You will find benches made from wood and often upholstered, while most of them are primarily made from plastic, resin or treated wood.

Bedroom Bench

A bedroom bench is most often backless and placed at the foot of the bed for convenience, additional seating, and as part of the décor. Bedroom benches may have storage, or not, and are mostly covered in fabric to coordinate with the style of the room.

Rustic Stone Bench

Rustic garden benches may be made with two boulders bracing a seat made from wooden slats or a thick slice of slate. You are most likely to see benches made from stone in a wooded or park-like setting.

Concrete Bench

Concrete benches may be decorated or plainly functional and are usually seen in a city park, business setting or government building. The concrete is practical as it needs little to no upkeep, is extremely durable, and will last for more than one lifetime.

While some can very well make your own bench, there are those who would opt to just buy them. Whatever bench style that takes your fancy, make sure that you only buy from a trusted maker or retailer to ensure quality.

Read More

Posted by on Mar 6, 2014 in Modern Patio Furniture | 0 comments

DIY Modern Patio Benches: Building a Wooden Bench

DIY Modern Patio Benches: Building a Wooden Bench

Take advantage of your garden, deck or porch by getting modern patio benches. The market today holds more styles and designs of benches than ever, so you should find the one that best suits your needs, style and even budget. But perhaps the most popular among them all are wooden benches. If you are considering buying one, make sure that you buy one from a trusted manufacturer to ensure high quality materials and construction. Below are some examples.

Sauna Bench by All Things Cedar

The Sauna Bench by All Things Cedar is a free standing cedar bench with a handy lower shelf for the shower room, sauna or by the pool side. Made with clear Western Red Cedar, it has a sanded finish with rounded edges. It features zinc plated hardware with a dowel and connector bolt assembly.

56 1/2″ Sakura 2-seater Bench by Anderson Teak

Designed with Asian flair, the 56 1/2″ Sakura 2-seater Bench by Anderson Teak features simple traditional stylish that has not ever and will never go out of style, but quietly blends with any décor. This furniture bench features a comfortable contoured seat that offer a convenient surface.

6-Inch Cedar Countryside Garden Bench by Creekvine Designs

The 6-Inch Cedar Countryside Garden Bench by Creekvine Designs exudes grace and refinement. Handmade with old-world craftsmanship from genuine red cedar, it’s the epitome of opulent outdoor living. This bench adds an element of splendor to any porch, patio, backyard, or gazebo.

If you are proficient with carpentry and DIY skills, you can build an outdoor wooden bench. In just one to four days, depending on the design that you want, you can create your own personal comfortable place meditating, bird watching  and chatting with friends.

  1. Select a spot for your outdoor or garden bench. In a flower garden, on a deck, near a bird feeder or bath or under the shade of a covered patio or front porch are popular places to relax.

  2. Choose a design. Do you want a back on your wooden bench, arms, a storage area under the seat, or cushions? Or would you want just a simple, natural, classic or ornamented style.

  3. Buy your materials, along with any tools that you need. Make sure that you consult with a formal design plan. Have your lumber yard or home improvement store cut the wood to measure, if you can.

  4. Decide on your finish. Will it be sealed , painted or just raw wood? Ask your sales associate for advice and buy the amount and any tools you will need.

  5. Assemble your outdoor or garden bench according to your design plan. Do the finishing work on your wood bench: painting, sealing, or sanding, and adding any other embellishments.

  6. Sit back, relax, sip a cool drink or read a book, and enjoy the fruits of your labor.

This can be a fun project that you and your family or friends can get involved in. Once the bench is finished, serve everyone some snacks to celebrate for a job well done.

Read More

Posted by on Mar 4, 2014 in Modern Patio Furniture | 0 comments

Enjoy Outdoor Eating with Cast Aluminum Patio Dining Sets

Enjoy Outdoor Eating with Cast Aluminum Patio Dining Sets

Your outdoor space, no matter how big or small, is your refuge from the outside world. And during the warm summer months, it can be the hub for  y family and friends. Perfecting your own al fresco refuge will take time, but tackling the problem of patio furniture should take you halfway through the project. But before you go out and spend a dime, you might want to take the time to really evaluate your backyard living space. Take the necessary measurements and decide what you really want in the space. Most importantly, determine your budget.

One of the joys of having your own outdoor space is having the liberty of eating outside and enjoying the scenery. Whether you do this with your early morning coffee, a Sunday brunch with the family, or grill night with your closest friends; nothing really beats doing it outdoors. Of course, you should also have the right dining set to boot. Perhaps the biggest decision that you will have to make when it comes to outdoor dining sets is the type of material that you want to have. One very popular pick today is cast aluminum patio dining sets.

The most obvious advantage of aluminum patio furniture is its resistance to rust. This material also weathers the sun very well and requires very little maintenance. Aluminum is relatively lightweight compared to other common materials, so rearranging the layout of your chairs and tables should be quick and easy. While many people might be turned off by the apparent lack of color choice in aluminum furniture, you should not be. A powder coating allows aluminum to go from its standard silvery color to a wide range of hues.

Royal Garden Aluminum Bistro Square Table Set by Jordan Manufacturing Company

A 3-piece folding bistro set, the Royal Garden Aluminum Bistro Square Table Set by Jordan Manufacturing Company includes one square-top foldable table and two foldable chairs. It is made of aluminum frame and PS slats and easy to maintain.

Euro 5-Pc. Dining Set in Black Aluminum Frame / Plastique by PolyWood

The crisp lines of the Euro 5-Pc. Dining Set in Black Aluminum Frame / Plastique by PolyWood can make your space similar to that of upscale cafes and restaurants. It features heavy-duty construction that can withstand nature’s elements.

Charter Cast Aluminum Dining Set by Alfresco Home

Made of durable cast aluminum frames that will never rust, the Charter Cast Aluminum Dining Set by Alfresco Home includes 4 stackable chairs and a 48-inch round dining table. The chairs can easily be stacked for storage, while the table includes an umbrella hole with plug.

To make your outdoor dining more comfortable, buy cushions with tags declaring that they are weather and UB-resistant. Also get an outdoor umbrella that is made of Sunbrella, which is a mildew-resistant acrylic fabric with a high UV rating, and comes with at least two ventilation slits for windproofing. Ideally, your patio set should be stored in a basement, shed or garage when winter arrives. If you do not have such space, you can just cover them with a heavy-duty vinyl all-weather tarp.


Read More

Posted by on Mar 3, 2014 in Modern Patio Furniture | 0 comments

How to Properly Refinish Aluminum Patio Furniture Sets

How to Properly Refinish Aluminum Patio Furniture Sets

Because of our seemingly renewed obsession with all things retro, aluminum patio furniture sets are now more popular than ever. Throw in a modern paint color like red or green, and should effectively add a conversation piece to your garden. So dig out your old rusted aluminum patio furniture and start painting. Below are the steps to properly do so.

  1. Thoroughly clean your aluminum furniture with your garden hose nozzle turned to its highest pressure setting. Dry it with towels or allow it to dry completely before proceeding.

  2. Remove the existing finish by painting a thick layer of paint stripper onto the aluminum furniture, allowing it to penetrate for 20 to 30 minutes. Use a scraper to remove as much original paint as possible. Use sandpaper to remove paint from stubborn areas.

  3. Remove the rust from the aluminum furniture. Most rust can be sanded off the furniture with medium grit sand paper. If it is extremely rusted, spray phosphoric acid on the furniture and allow it to dry, usually 20 to 30 minutes. Go over the furniture with a steel bristled brush to remove the remaining rust. Rinse the furniture with water to remove the acid and the rust from sanding.

  4. Spray on primer in a back and forth motion, slightly overlapping each stroke to ensure full coverage. Use two coats of primer, allowing each to dry completely

  5. Paint using a spray paint made for metal. They come in a number of brands and in many colors. Spray paint is available in both satin and gloss finishes. Allow the paint to dry for 24 hours.

To add a little flair to your patio set, use a complimentary color of paint to add a design using a stencil. You can buy stencils at most craft stores. Cover the portion of the chair that you do not want to paint, securing it with a low-tack tape, and spray paint your chosen design. Let the paint dry before removing the stencil. Or, you can just buy these stylish sets.

Place some pillows, made from outdoor fabric, on your chairs to complete the look. Outdoor fabrics are made to withstand sun exposure and normal outdoor conditions. However, you need to move the cushions indoors during rain or snow.

Read More

Posted by on Feb 15, 2014 in Modern Patio Furniture | 0 comments

How to Repair Folding Aluminum Patio Chairs with Screws

How to Repair Folding Aluminum Patio Chairs with Screws

Many people opt for aluminum chairs when they are furnishing their outdoor space. Aluminum chairs are lightweight and easy to carry. They are nice during summer and allow breeze to flow through the strapping. Below are some great and stylish examples of aluminum chairs.

Replacement webbing for folding aluminum patio chairs is available in two sizes and in many different colors. The webbing is attached to the chair with either screws or clips. The webbing is inexpensive so it is practical to repair the chair, instead of replacing it.

  1. Remove worn or broken strips, setting aside the screws. Examine the frame to see if any screws need replacing, and buy them if necessary.

  2. Measure the distance between the holes in the frame of the chair. For straps running from one side of the chair to the other, measure the distance between corresponding holes on either side of the top of the seat. Add 4 inches to this measurement to calculate the length of the horizontal straps.

  3. Measure the distance between the holes for the vertical straps with the chair folded. Measure the distance from the center hole in front of the top of the seat, down around the metal bar at the back of the seat, and up to the center hole on top of the front of the back seat. Also add 4 inches to get the length of the vertical straps.

  4. Cut your strips using the measurements. Fold the end of the strip at a 45-degree angle so the top of the strip touches the side of the strip. Fold this side down so it is perpendicular to the side of the webbing. The end of the strip will be a 90-degree point.

  5. Stick a screw through the center of this point. Screw it into the hole in the back of bottom of the frame where a strip is missing, so the strip sticks out from the frame. Wrap the strip of webbing around the frame and weave it over and under every other strip. If the strips on either side go under, weave it over; if they go over, weave it under. Weave vertical strips with the chair folded.

  6. Fold the other end of the strip into another point with the folds facing down. Wrap the end of the strip around the other side of the frame. Stick another screw through the strip so it aligns with the hole in the frame. Replace the screw in. Replace any other missing strips in the same way.

If you are replacing all the webbing on the chair, start with the horizontal strips. Of course, you do not have to weave them.

Read More